
There are a vast array of tools available to build models of all kinds. Knowing what each do, and what you really need to get started, can be difficult. In this Buyer's Guide we will start by telling you which are the most important tools to get you started, then we will discuss come of the more specialised tools available.
Just starting out with model building, getting back into the hobby after a long break, or looking to buy a model kit as a gift? We understanding where to start can be difficult so we have prepared a Buyer's Guide to Plastic Model Kits to help you.
What are the essential tools and accessories?
There are a few essential tools and accessories that I recommend you get when starting out. Many of these essential tools can be found in a tool set, such as the Model Craft Pro Plastic Modelling Tools Set.
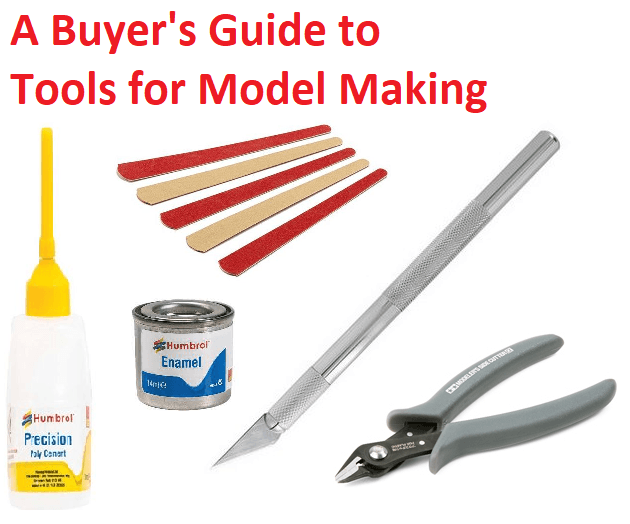
The essential tools that you will need are: Side Cutters, Craft Knife, Abrasives, Brushes, Glue, and Paint
Side Cutters
Commonly called 'clippers', and occasionally 'diagonal pliers', these are used for removing the parts from the sprue. You could use a craft knife to do this but they put pressure on the parts, which will often break or bend the parts out of shape. A pair of clippers will allow you to get close to where the part joins the sprue and snip it off neatly. There will always be a little bit to tidy up, which is where your knife and abrasives come in.
Side cutters vary greatly in quality and shape. Cheaper options such as the Model Craft Side Cutters are suitable for beginners and are perfect for larger parts. Tamiya make several high-quality clippers such as the Sharp Pointed Side Cutters, which are great for use on very small parts but may be damaged if used on larger parts.
Craft Knives/Scalpels
When you remove a part from the sprue there will usually be a small area to tidy up, which is where the craft knife comes in. Be careful with your fingers and gently trim away any sprue left on the parts. You would also use you knife to cut out your decals. you can do this with scizzors but your craft knife will usually be more precise. Craft knives come in different sizes and there are many different shapes of blades to choose from. From ModelCraft we have the Exacto-type craft knives and blades, and we also stock the surgical scalpels from Swann-Morton.
Parts will often have mould lines along the side, where the two halves of the mould met. This can be removed by carefully dragging the side of the knife blade along the line. There are also specialist mould line remover tools available.
Abrasives
There will be times where you need to be more subtle with tidying up parts, or need to work on a larger area. Abrasives make this much easier. Metal needle files some in a range of shapes and are great for working on small areas. For larger surfaces sanding sticks and blocks are more suitable. These are available in a range of grits so you can start off rough and work down to a fine polish.
Tweezers & Pliers
It is also good to have at least one good pair of tweezers. This will help when holding very small parts that can be difficult to hold with your fingers. You will also want tweezers to putting decals in hot water. There are specialist decal tweezers, which are smooth and flat, but you can get away with pointed tweezers. There are sets of tweezers available that include a few different point tweezers and a pair of decal tweezers. When you need to get a stronger grip, go for a pair of pliers.
Paint Brushes
Paint brushes are available in various shapes and sizes. Flat brushes are perfect for painting large and flat surfaces such as the hull of a tank or fuselage of an aeroplane. Round brushes are more suited to curved surfaces such as on figures, and for small details such as on instrument panels. Both natural hair and synthetic brushes are suitable for use with enamel and acrylic paint, but natural hair brushes work better with enamel paints and synthetic brushes work better with acrylic paints. Hard-bristle brushes are best for stipple effects, and soft-bristle brushes are designed for applying cellulose dope to canvas on wooden aircraft models.
Glue
The most essential accessory you will need is glue, usually called poly cement. For small parts I recommend one with a fine needle tip such as Humbrol Precision Poly or Revell Contacta Pro. For larger parts, where the glue would star to dry before you got all the way round, I recommend a thin liquid cement such as Tamiya Extra-Thin Cement or Mr Hobby Cement-S. With these you can put the parts in place first and brush the glue along where the parts meet; ideal for large aircraft fuselages and ship hulls.
There are also specialist glues available for clear parts as the normal poly cement will damage clear parts. Revell produce Contacta Clear, Humbrol have Clearfix, and Microscale have their Kristal Kleer for this purpose. The Humbrol Clearfix is of a very thick consistency and can be stretched across small areas to create windows and lenses. Many kits, particularly of cars and bikes, will include pre-chromed parts. Normal poly cement can have a tough time getting through the chrome so you would need to scrape the chrome away from where you need to join these larts. However, Revell produce a poly cement specifically for forking with these parts - Contacta Liquid Special.
The more advanced plastic model kits will often include thin sheets of fine metal parts for very small details. For these you will need to use super glue (cyanoacrylate). As these parts you want to use the smallest amount of glue possible. There are three options for how to do this. Firstly you can get a thick super glue, squeeze out a drop onto your workstation, palette, or tile, then carefully touch the part to the glue, which will pick up just a small bead of glue. This works well when you only need to put glue in one point, but often these parts will have multiple points that require glue, especially in the case of railings for ship models. For this it is better to use a thin glue, again squeeze out a blob of glue (be careful as thin super glue runs like water), then use a specially designed supler glue applicator. These tools have two small prongs that pull a small amount of glue between them whe placed to the blob of glue, then release it when placed to where you need the glue to go. The thir option is a special kind of super glue that is set with UV light, which gives you time to get parts into place before you set the glue - particularly useful for parts with lots of contact points such as railings on ships.
Paint
You will also need to get paint for your model. The instructions included with your model will tell you what paint colours are recommended. There are different types of paints for models, each with their own pros and cons. We have a separate article all about model paints.
I recommend choosing water-based acrylic paints as they dry quickly and you can wash your brushes in water. These are the paints that are included in all of the model kits starter sets. Some model kit manufacturers such as Tamiya, Revell and Airfix (Humbrol) produce their own range of paints. If you have a preferred range of model paints, or you have some model paints left over from a previous project, and the kit you have chosen indicates paint from a different range, there is a great model paint conversion website called ModelShade that you can use to match paint from one range to another.
What other tools and accessories are there?
Even within the essential tools there is a large variety of different types and quality. In addition to that there are a great many other tools and accessories available that do a more specialised job, are designed to make certain tasks easier, to provide a better quality finish, or to allow you to do more advanced techniques such as weathering.
Airbrushes & Air Compressors
Take your painting to the next level with an airbrush. Check out our Buyer's Guide to Airbrushes for Model Making.
Decal Setting Solutions
These are designed to help your water-slide decals adhere to the surface of your model. They also soften the edge of the decal so it is less noticeable and allows them to more easily settle into small recesses such as panel lines on aircraft. The most popular of these is the Microscale Micro Set, but there is also the Revell Decal Soft, Humbrol Decal Fix, and Mr Hobby Mr Mark Setter Neo.
In addition to the setting solutions there are also decal softening solutions. These are for use when your decals have to setting into deeper recesses or over rougher surfaces. Again the most popular is from Microscale with their Micro Sol, and there is also one from Mr Hobby with the Mr Mark Softer Neo.
Model Filler & Sculpting Putty
It is common for models, particularly older ones, to have noticeable gaps between sections such as where the wings meet the fuselage on aeroplanes. To fil these small gaps you can get a model filler or sculpting putty.
There are several model fillers are available: Humbrol Model Filler, Revell Plasto, and Mr Hobby Mr White Putty. These fillers are a fine gritty paste that dries quickly and can be sanded smooth with fine abrasives. The Vallejo Plastic Putty is similar but is smooth rather than having a rough texture.
If there are larger gaps you can use a two-part epoxy putty, which can fill large areas. These putties give you a few hours to work with and be sanded, cut, and drilled into once dry, making them particularly good if you need to replace a damaged section. In addition to filling gaps these putties are great for sculpting with. Milliput comes in several grades and colours and sets hard. Green Stuff works in the same way but sets to a tough, rubbery consistency so is ideal for small details where the harder-setting putties would become brittle. These can also be used to add weight to a model, such as in an aeroplane's nose cone, but I would recommend using Deluxe Materials Liquid Gravity for adding weight.
Sculpting Tools
Following on from the two-part epoxy putty that can be used for sculpting, you have sets of sculpting tools and probes to help you shape the putty. The Model Craft Sculpting Tools 6 Piece Set includes a wide range of tools with differently shaped tips. I also find the Tamiya Paint Stirrers to be great sculpting tools, as they are perfectly flat and smooth at one end, and have a nice curved spoon-shape at the other.
Cutting Mats
It is well worth considering getting a cutting mat to work on when building your models. Not only will it help protect any surface you are working at but it also make it easier when you need to lean against a surface while cutting, such as when cutting out your decals or when cutting masking tape to make paint masks. Cutting mats are available in a wide range of sizes from the small A5 Cutting Mat all the way up to the huge A1 Cutting Mat.
Work Stations
Cutting mats brings us perfectly onto work stations. While a cutting mat will give you something to work on, a work station will help keep your work area tidy, and if you don't have somewhere permanent to work such as using the kitchen counter when you get get to it, you can just pick up and move the workstation without having to pack everything away. All work stations feature places to store your brushes upright and somewhere to put your cup of water or thinners, as well as a working area where you can put your cutting mat, such as the nice quality ModelCraft laser-cut wooden A4 Work Station and A3 Work Station. Moulded in plastic, the Humbrol Work Station and the Revell Work Station also feature a slot to hold your instructions and slots for their own paint pots.
Paint Palette
A paint palette is a place to place an mix your paint while working. There are many options. You could use a paint palette for with several 'wells' such as the Tamiya 15 Well Paint Palette Set. Using a plain white ceramic tile, with a gloss finish, is a popular choice as these are easily scrubbed clean after use. You could even just use the work surface of your workstation, just be aware than thich paint residue will eventually build up and leave you with an uneven surface to work on.
Specifically for use with water-based acrylic paints are wet palettes. With the use of hydro foam sheets these palettes help keep water-based acrylic paints wet for longer, giving you longer to work with the paint. This also has the added benefit of making your paint go much further as you aren't having to use more paint just because the paint on your palette has dried up before you can fininsh with it. We stock the fantastic Army Painter Wet Palette, which features a sealable lid so that you can leave your paint for a short time and come back to it without the paint having dried, and includes an insert for storing your brushes.
Hand Drills and Drill Bits
Occasionally you will find noted in your instructions that you need to make a specific diameter of hole. You can sometimes get away with twisting the tip of your craft knife to make a hole, but it is difficult to get the size of the hole right and it will be carved in with the angle of the blade point. This is also a great way of blunting and breaking the tip of your knife. To be more precise, and protect your blades, I recommend getting a small hand drill (often called a pin vice) and a set of drill bits.
The perfect place to start is the Model Craft Pin Vice wit Drill Bits, which includes 5 drill bits of common sizes. Tamiya also produce several hand drills for fine drill bits.
In addition to these you can get packs of drill bits, such as the Model Craft 20 Piece Metric Drill Bits Set, which includes small drill bits from 0.3 mm up to 1.6 mm. There is also the Model Craft 10 Piece 2.35 Shank Drill Bit Set, which includes drill bits from 0.5 mm up to 2.2 mm. In this set all of the drill bits have a 2.35 mm shank diameter that allows you to get a better drip on them with a larger chuck size in your drill.
Holding Tools
There are lots of different tools for holding model parts, or even holding whole models while you work on them.
First off we have spring clamps. These are clamps that apply pressure on a point using a spring to keep tension. At the tips there is a small flat grip that hinges to keep a tip flush against where you apply the clamp. You can get a pack of small spring clamps in the Revell Model Clamps Set or a variety of different sizes in the Model Craft Nylon Grip Clamps Set.
Next up we have the ubiquitous G-Clamps, available in a range of different sizes. These are ideal for holding flat surfaces together, especially when a lot of pressure is required.
There is also now a type of clamp that is great for model building called the Berna Multi-Clamp, which applies pressure similar to the way you would hold a part with your fingers. These are available in two sizes; the Model Craft 80 mm Berna Multi-Clamps 2 Piece Set and Model Craft 200 mm Berna Multi-Clamp.
Most commonly used by miniature figure painters Universal Work Holders feature a vice-like head with pins that can be placed to hold awkwardly-shaped pieces.
Measuring Tools
Steel rulers are available in various lengths. Not only are they perfect for measuring but metal rulers give a perfect straight edge to cut along with a knife. Calipers are ideal for mearuring thicknesses, and diameters, while micrometers are finely calibrated for the smallest of measurements.
Saws
We keep a number of saws in stock from incredibly fine photo-etched craft saws up to the large Tamiya Modelling Razor Saw. We also stock razor saws and piercing saws from ModelCraft. To help neatly cut angles we also have available an aluminium mitre box.
Scribing & Scraping Tools
When using the edge of your knife to remove mould lines there is a change that it will judder, leaving a series of lines in the surface, or it can catch and dig in to take off more than you wanted. To solve this problem there is now a dedicated mould line remover. Whether improving the panel lines on an old model or adding them to a simple model, a plastic sciber makes it easy. Get yourself a high quality scraper to inscribe extra details into your models or remove mould lines for small spaces.
Pipettes & Syringes
Whether mixing two paints to get the perfect colour, or thinning your paint for use with an airbrush, get yourself some pipettes or syringes for precise measurements.
Magnifiers
Get a close look at small details with our range of magnifiers. These come in many forms including Magnifier Glasses with various lenses, Handheld Magnifiers, and the useful Helping Hands featuring a magnifier on a stand with clips to hold small parts while you work on them.
Masking
Masking off areas of your model are a great way of protecting one colour while you over-paint with another colour, especially when using spray paints or an airbrush. Get neat straight lines with model masking tape. Create sweeping lines with flexible masking tape for curves.
You can also get a liquid masking fluid such as Humbrol Maskol or Revell Color Stop. With a liquid masking fluid you can brush it on line paint, let it dry, paint over it, then carefully peel it off to reveal the surface underbeath. These are ideal when trying to mask hard to reach places, comples curves, and areas where stopping paint 'bleeding' is crucial. A popular use of liquid masking fluid is on clear parts such as the canopy of an aircraft cockpit where you can brush it on then scrape it away from the raised struts that need painting.
Specialist Tools for Wooden Model Kits
There are a few tools to help with building wooden model kits, and wooden ships in particular. Artesania Latina produce a set that includes the basic tools required for building wooden ship models.
Plank Benders
The hull of a wooden ship model is formed by assembling a skeleton sonsisting of the keel and a number of upright ribs, then applying strips of wood to form the skin of the hull. Usually this is done in two layers with the first layer of roughter wood that is pinned and glue in place, and sanded smooth before thin strips of high quality wood are applied. These strips have a certain amount of flexibility and will easily form to gentle curves. However namy ships will have tighter curves, such as at the prow, where the wood would split if you try to bend it. This is where plank bending tools come in. There are two different types of plank benders.
The first uses is a pair of grips that you use to pull a strip between a blade and a flat plate, curling the strip in a similar way to running a ribbon across a pair of scizzors. The danger with this is if you accidentally press too hard it will cut through the strip. You can turn the blade around and use the blunt back of the blade to crimp along one side of the strip. We have these tools available from both Artesania Latina and Model Craft.
The second type in an Electric Plank Bending Tool. This device is like a soldering iron but with a round roller instead of a soldering tip. To use this you would soak the wood, allow the plank bender to heat up, then use the former supplied to curve the wood. This is essentially an easy way of steaming the wooden strips to make them more flexible.
Pin Pushers
The first layer of planking is held in place with brass pins in addition to wood glue. You can tap the pins in with a small Watchmaker's Hammer, but there is an easier way. With a pin pusher, or nail nailer, you drop the pin into the end of a tube (with the point facing out) and press it into where you want the pin to go. The tube retracts into the boxy of the tool, whicle a rod inside the tube pushes the pin forwards. This saves you trying to hold a tiny pin in place and accidentally hitting your fingers with a hammer.
Building Slip
It can be tricky to get the ribs of you wooden ship model perfectly vertical, and they need to be for the hull ot be properly formed. To help you with this there is the Billing Boats Building Slip. This tool clamps your keel in place and has a vertical plate that slides along so that you can place each rib against it as you put it in place, ensuring that each is placed perfectly.
Hull Holding Vice
It can be a big help to be able to tilt and turn your model to get better access to the section you are working on. Wooden ship models are generally large and unwieldy, with delicate parts that could easily break if you drop the model or catch it on something. To make things easier you can use a hull holding vice. This clamps onto your desk and holds the keel of you ship in its jaws, keeping the model securely in place while you work.
Cellulose Dope
When building a wooden aeroplane model, just like in a real wooden aeroplane you build the frame then cover it in canvas or tissue paper. Cellulose dope is used to harden this covering before painting. There is also a shrinking dope that will tighten the covering at the same time. Make sure to grab some cellulose thinners to clean your brushes with. We stock both shrinking and non-shrinking dope, as well as thinners, from HMG.
Specialist Tools for RC Models
There are a few specialised tools for building and maintaining radio-controlled models. Most of the specialised tools for building a radio controlled model are included in the kits.
Tool Sets: Tamiya produce a Bastic Tools Set as well as an 8 Piece RC Tool Set.
Screwdrivers: Every RC model includes a load of small screws to hold the components together. Tamiya produce a high quality large philips head screwdriver and medium philips head screwdriver specifically designed for their RC models.
Box Wrench: One of the tools you will use most often when building your radio controlled model will be hex wrenches. The Tamiya box wrench features different sizes of hex wrenches all in one tool.
Allen Keys: You will also find it useful to have a few sizes of allen keys on hand.
Scissors: Many of the rc models include a clear vacuform polycarbonate body shell. You will need to carefully cut away the body shell from the excess. Tamiya produce high quality straight scissors and curved scissors to help you with this.
Wire Connectors: When rewiring or extending wires you will need a way of connecting wires so that components can easily be removed and replaced. Bullet connectors are ideal for this. The Tamiya Snap Connector Set includes bullet connectors, protective covers, and a handy tool.