
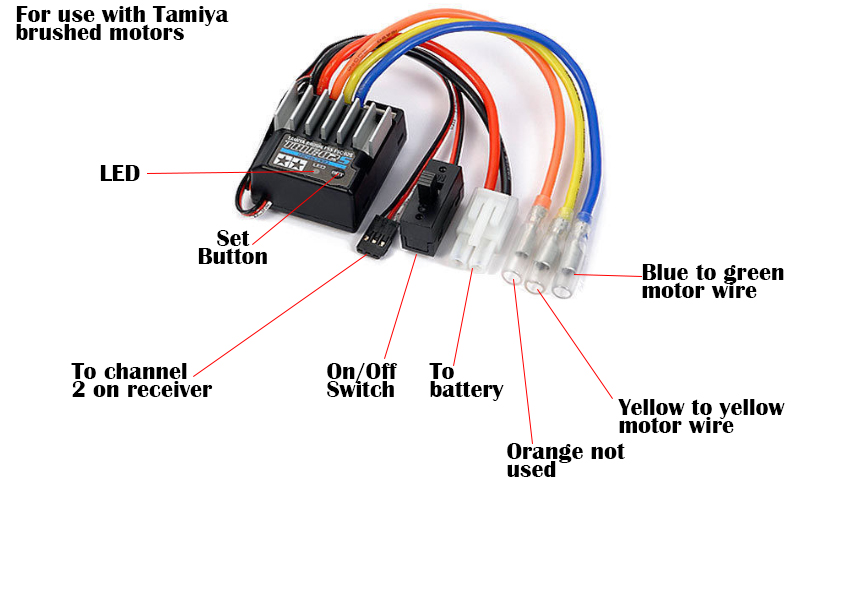
The orange cable and white pin connection are not used as they are for a brushless motor setup. You need to set up the ESC into BRUSHED mode as the RC car is not supplied with a brushless motor.
Step 1: (Optional) Peel off the sticker covering the ESC as it does not always allow you to press the set button properly. (it can be stuck back on after the set up)
Step 2: Make sure that the red/white/black wire from the ESC is in the channel 2 slot with the black wire facing the nearest edge of the receiver.
Step 3: Motor wires are attached, yellow to yellow and blue to green (orange wire is redundant for brushed)
Step 4: Switch on your controller ensuring the throttle (ch2) reverse switch is set to N (these are at the bottom of the controller with R on the left and N on the right)
Step 5: Put your controller to the side and make sure your fully charged battery is attached.
Step 6: Using a Philips screwdriver or something similar press down on the ESC’s set button and hold it down, now switch the power on to the car.
Step 7: If done correctly you should get the following sequence of lights on the ESC, Red-Green-Orange. (the red and orange do look similar but they are different)
Step 8: Release the set button when the light sequence turns ORANGE (remember RED then GREEN then ORANGE)
Step 9: You should now get an ORANGE-GREEN-ORANGE flashing light sequence on the ESC
Step 10: Press the set button ONCE when the light flashes GREEN to select BRUSHED mode.
Step 11: Press the set button AGAIN to complete and save the setup. (be aware that if successful the motor may start running so make sure you have the wheels off the ground)
Step 12: Switch off the cars power
You now need to go through the high point set up process
Step 1: Disconnect the motor wires; ensure controller is still turned on.
Step 2: Using a Philips screwdriver or something similar press down on the ESC’s set button and hold it down, now switch the power on to the car.
Step 3: This time when you get the Red-Green-Orange sequence of lights you need to release the set button when it turns RED.
Step 4: If done correctly the ESC should flash GREEN and go off (sometimes it will flash green several times)
Step 5: Press the set button ONCE to set your throttle to neutral.
Step 6: You should get a SINGLE FLASHING RED light, push your throttle stick fully forward and hold it in place, now press the set button ONCE and release your throttle stick.
Step 7: If done properly you will now have a DOUBLE FLASHING RED light, at this point pull the throttle stick into full reverse and hold it, now press the set button ONCE and release the throttle stick.
Step 8: The LED should turn off indicating that the setup is complete.
Step 9: Turn off the power to the car and re-attach the wires to the motor.
Step 10: Turn the power on to the car and leave it for a few seconds, you should hear a couple of beeps to indicate the ESC is initialising.
Step 11: Push forward to test the throttle.
Step 12: Pull back on your throttle to apply the brake.
Step 13: Release the stick and pull back again on the stick initiate the reverse.
Step 14: Note: Sometimes it may take a couple of attempts going through the high point set up to get the reverse throttle to initialise.
Hopefully this helps as this cuts out the non-essential info for applying a brushless set up. Be aware that it may take a couple of attempts to get the set up done correctly as it might not register the reverse function first time round.
NOTE: IF YOU FIND THAT YOUR STEERING IS LIMITED OR NOT WORKING, THERE IS A DUAL RATE DIAL ON THE TOP RIGHT OF YOUR TRANSMITTER/CONTROLLER. ENSURE THIS IS TURNED FULLY CLOCKWISE TO OPEN UP THE STEERING TO IT’S FULL RANGE.
MAKE SURE THE SERVO LEAD IS PLUGGED INTO CH1 SLOT IN THE RECEIVER AND THE DARKEST WIRE IS FACING THE OUTSIDE EDGE.